Once I start… I just can’t stop. I have headstones, the skeleton in a cage, not to mention the creepy casket. But I just can’t bring myself to be done with my graveyard yet. These DIY cemetery pillars that stood on either side of my entryway to the graveyard will leave you “dying” to try this one yourself.

This post is affiliated with a paid partnership with OOK Hardware. and contains affiliate links. Please visit my disclosure page if you would like more information and thank you for your support.
Supplies needed for your DIY Cemetary Pillars:
– 1/4 Inch Backer Board
-4 2×4 pieces of wood (I ripped them down into 2×2 with my table saw, but if you don’t have one you can get 8 2×2 pieces)
– Foam heads
–Spray adhesive
– Mortar
-PVC Pipe
-Rebar
Tools needed for your DIY Cemetary Pillars:
–Table Saw
–1 1/4 inch screws
–Sander/ Sanding disks
Step 1: Find your spot
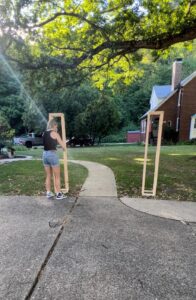
The first thing you need to do is find the perfect place to put your pillars. I had the perfect spot- which actually is why I dreamed these pillars up. Looking at my cemetery, I have a sidewalk that leads right to it. I knew I needed something to invite my bravest tourists into the cemetery. I used this knowledge of positioning to make the correct base size that would both support my pillars and arch, and also fit at the entrance to the cemetery! I used my table saw to all 8 pieces of 2×2 into 69 inches, 12 inches, and 9-inch pieces. Each piece! This will be used to assemble the top, the bottom, and the long vertical pieces to the pillars.
Once I had each 2×2 cut, I took the 9 and 12-inch pieces and made a base. Then screwed the 69-inch vertical pieces to that base, and walked them to their final spot at the beginning of the cemetery path. One thing that was important once you find their spot, I slipped PVC piping onto the side of each of the pillars, then I pounded rebar into the ground. I slipped the pipe over the rebar, and that stabilized the pillars. Becuase as much as I love the pillars, and I love how scary they are… it would be too frightening to think of them falling over on a trick-or-treater.

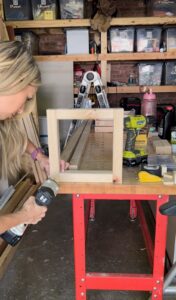
Step 2 – Wrap them up
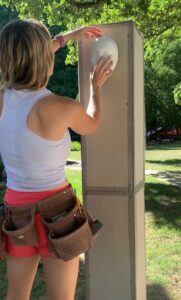
After assembling the pillars, this is where your backer board comes in. I wrapped each size with 1/4 inch backer board, securing it to the posts with screws. To make them unique… this is when I also added the foam faces. I cut the back off of the faces to make them lay as flat as possible and attached them to the backer board with a spray adhesive.
**ALTERNATIVE – Don’t forget… this is your project! If you think foam skeletons, spiders, or creepy faces look better than the foam ones I tried, don’t be afraid to branch out! Just make sure you send me a picture of what you design on Instagram and or Facebook because I love seeing what you come up with!
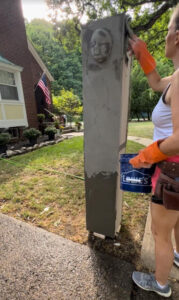
Step 3 – Mix it up!
Now that you have them assembled, it’s time to make these rectangles look like heavy concrete stones. For that, I used mortar, so start mixing! Mortar doesn’t stick well to foam. Knowing that I made my first round pretty thin so that it would be able to grab onto the facial features of my foam pieces. I put it on all of the pillars as a first coat, but was sure to make my second coat a little thicker, and applied it on top of that. Once I had two coats on and dried… I gave them a quick sanding. They look AWESOME and I can’t wait for you to see the top of the arch!
If you decide to finish off your pillars with some lights or crawling vines… power to you. You know me, the more the merrier when it comes to accent pieces.
Also—- this picture reminded me that SO MANY of you wanted to know where my shoes were from. Amazon, baby!
These pillars to the perfect touch to welcome trick-or-treaters into the yard of terrors!