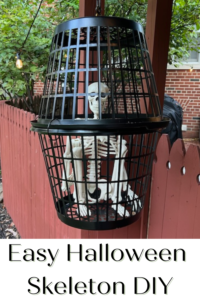
DIY Halloween projects don’t get much easier than this DIY Skeleton Cage Project! Halloween is just around the corner for my crafty friends.
(looking for a trickier project? We have those too! Check out our pillars, or our pillar arch!)
Halloween is one of those holidays that can get left out with decorations. I find that you either love decorating for Halloween…. or you skip the holiday and go for an overall Fall decor. If you’re one who loves the spooky decor but doesn’t want to invest too much monetarily, this skeleton cage craft is the one for you.
The idea of creating cheap Halloween DIYs popped into my head, and I wanted to find the perfect balance of spooky without gory. I really think this nailed it!

This post contains affiliate links. Please visit my disclosure page if you would like more information and thank you for your support.
Supplies needed for your DIY Halloween Skeleton Cage:
– 2 round plastic laundry baskets
-3 foot chain (I love the idea of using this chain that is already black, but if you can only find gold you can always spray paint it!)
-A plastic skeleton (I chose a 3 foot skeleton as my prisoner)
– Any 1 x poplar material to rip into smaller pieces for the mosaic pattern (or see step 2 for other alternatives)
– 4 shower curtain rings
– Black Outdoor Spray Paint
The only tools needed for this DIY is whatever you choose to use to hang it. And if you end up just draping the chain over something… no tools needed. Now THAT is an easy craft!
Step 1 – Lay out the drop cloth of your choice and spray paint
This DIY Skeleton Cage Project is one I did outdoors because spray paint might be needed. The first step is going to be to lay out a drop cloth and prepare for painting! When it comes to drop cloths, I’m no snob and you can use anything that gets the job done! If you need a suggestion, I love this tarp. All things that need to get painted need to be done first, so they can dry and be assembled. I started by spraying the baskets, then set them aside to dry because they need to be clamped together first. Then lay that long chain out, and spray it down! This one might need a few more coats to get all sides of the chain! (If you can’t find black shower curtain rings, don’t forget to spray those too!)
Step 2 – Assemble the baskets for your skeleton cage
Take one of the baskets, and set it up like normal. Then, grab your prisoner! 😉 Mine was a 3-foot skeleton this year, and he was a very charming captive! Prop them up in the basket, then take basket #2 and turn it over the top. This is when you’ll need the shower curtain rings! Clamp those two baskets together going all the way around. (If you’re worried about the prisoner shifting or trying to escape, feel free to add some super glue or hot glue to the bottom of basket 1. I like to leave it separate for easier storage, and I don’t mind if he shifts around in there a bit. That just adds to the spooky aesthetic!)
**ALTERNATIVE – If you couldn’t find the shower rings, black zip ties would work. You would have to cut them to get the skeleton out, or you could store it all together!
Step 3 – Add the chain to the top of the skeleton cage
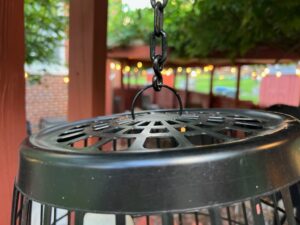
Depending on the type of basket that you’re able to find, you may need some glue on this portion as well. My baskets were woven on the bottom as well as the sides, so I looped the chain through those holes using one of the shower rings.

Once the chain is attached to the basket- find the spooktacularly perfect place to drape that guy. Mine fit perfectly on out the patio but may make his more permanent resting place in the DIY cemetery.
This is a Halloween craft that is simple and such a cute conversation starter. If you decide to try this DIY Skeleton Cage Project, be sure to tag me in a picture on social media!

** This is not my original idea- simply my take on it! Other creators have done versions of this craft as well… specifically thenavagepatch.com and thetiptoefairy.com. Be sure to send them some love! If you attempt this project too, please feel free to tag me on Instagram or Facebook. love seeing what you come up with! **
