So if you have been a frequent follower of my DIYs… thank you, and hi! You know that I did a DIY bench makeover for Halloween with a bench that I scored on Marketplace. If you are new here, feel free to go back and check out that post about how to spookify a bench. But for the holiday lovers like me, Halloween is done, and here come the holidays. I knew I wanted to start with this bench as a simple DIY.vAfter Halloween, I had to revamp it and make it into a Christmas bench.
This post contains affiliate links. Please visit my disclosure page if you would like more information and thank you for your support.
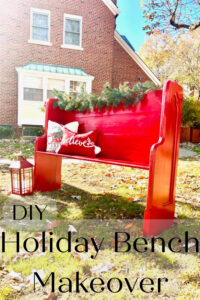
Supplies needed for the DIY bench makeover:
– A bench, pew, swing… anything that you want to makeover!
-Red outdoor paint
-A dropcloth
-Accent pieces (I went garland and throw pillows for the holidays, and a classic red lantern. But you could add lights, or a stuffed Santa… whatever your holiday vibe may be!)
–D- Rings
Tools needed for your DIY Christmas Bench makeover:
–Sander (electric, or hand-held sanding papers)
-Drill
(Don’t you just love a project that takes minimal tools? Don’t get me wrong, I love getting those power tools out too…. but man a simple DIY is sometimes so fun!)
Step 1 – Find your bench
As I mentioned above, I found my bench on Marketplace. I think it might have been a pew at one point… but regardless… it needed some attention. This is what it looked like before and after I made it Halloween-ified. If you are;t starting with an already painted bench, there isn’t a lot you need to do! I will be sanding off the Halloween paint, but if you aren’t starting from scratch, I wouldn’t prime or sand it so that you can continually change it with the seasons.
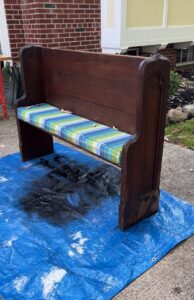

Step 2 – Sand it down
If you are coming from the previous bench post, and you’re turning it from Halloween to Christmas, sand off the old paint.
On the Halloween bench, I used outdoor paint to paint everything grey… So I gave that a quick sand to strip it down, then I added the red!
Step 3- Choose your color
The next step is deciding what you want the base color of your bench to be. I went bright, Christmas red because not only does it pop, but it matches my color pallet. So Lay down your drop cloth and get to painting.
*Remember, if you decide not to go red, I need to see what you choose to go with! I love to see the tweaks on my ideas, so be sure to tag me on FB and Instagram!**

Step 3 – Add the props and accents!
I wanted to add garland, I knew that right away. The type of garland I wanted to add wasn’t lit but needed to be attached to the bench, so I used D-Rings You could drape it over, but I wanted to be sure mine wouldn’t blow away so I made sure it was attached.

Then I added my pillows and my lantern. This turned out PERFECTLY for the front of my house and is such a great way to welcome the holidays into my home. A simple, vibrant DIY that leaves me feeling both holly AND jolly. What more could you need?!
