Aloha! I’m so excited about my IKEA Rast makeover!
We have had these dressers since my daughter was about 2 years old, and you can see below the amount of abuse they’ve taken over the last 11 years (we actually bought three, but we’re only doing this one for her bedroom).
So sad! Complete with red crayon marks and pen. Classy, right?
So I put her to work refinishing it. If my 13-year-old can do it, you can do it!
(This post contains affiliate links. Please visit my disclosure page for more information, and thank you for supporting my craft and woodworking addiction!)
Steps to makeover your IKEA Rast dresser
Step 1 – Prep the dresser for painting
Since I was replacing the knobs with pulls, I removed the knobs and filled the holes with DAP Plastic Wood.
Since ours had years of pen and crayon and kid-prints all over it, we gave the drawers and front a good sanding with my orbital sander and 120 grit sandpaper followed by 220 grit. I will link to the products we used below as well.
Step 2 – Paint the dresser
I decided to try the Magnolia Home chalky paint sold at Target. The color is called Weekend, and it looked like exactly what I was looking for! As someone who has painted a lot of furniture, I can’t say that this was my favorite paint to work with. I do love their walls paint, though!
We did a light sanding in between coats as I usually do with chalk paints. My favorite sanding sponge is by Gator brand.
Step 3 – Seal the paint
I chose to also use the Magnolia brand wax. I’ve used it before, but never on a dark paint. In hindsight, I wish I would have just used Minwax polycrylic in a matte finish. Oh, well.
Step 4 – Drill new holes
This part will depend on the pulls you choose. I kept mine at the same height as the old knobs (centered vertically on the drawer). And I used these black pulls from Amazon.
Step 5 – Spray paint pulls
This step is obviously optional. I did a pole on Instagram and a Facebook group I’m in. It was a close tie between the black and gold in the beginning, but people changed their minds when I did a sample gold pull! If you’re not already following me on Instagram, we have a good time over there. 🙂
And that’s it! It’s like an entirely different dresser! Crazy what a can of paint and some new pulls can do for a piece of furniture!
Aloha,
Charlee
SOURCES:
Dresser – Ikea Rast
Green paint – “Weekend” by Magnolia Home (available at Target and Ace Hardware)
Black pulls – Amazon
Gold spray paint – Amazon
Pineapple bookends – Target
Rug – Rugs USA
Black and white planter – Target dollar section
Wave artwork –
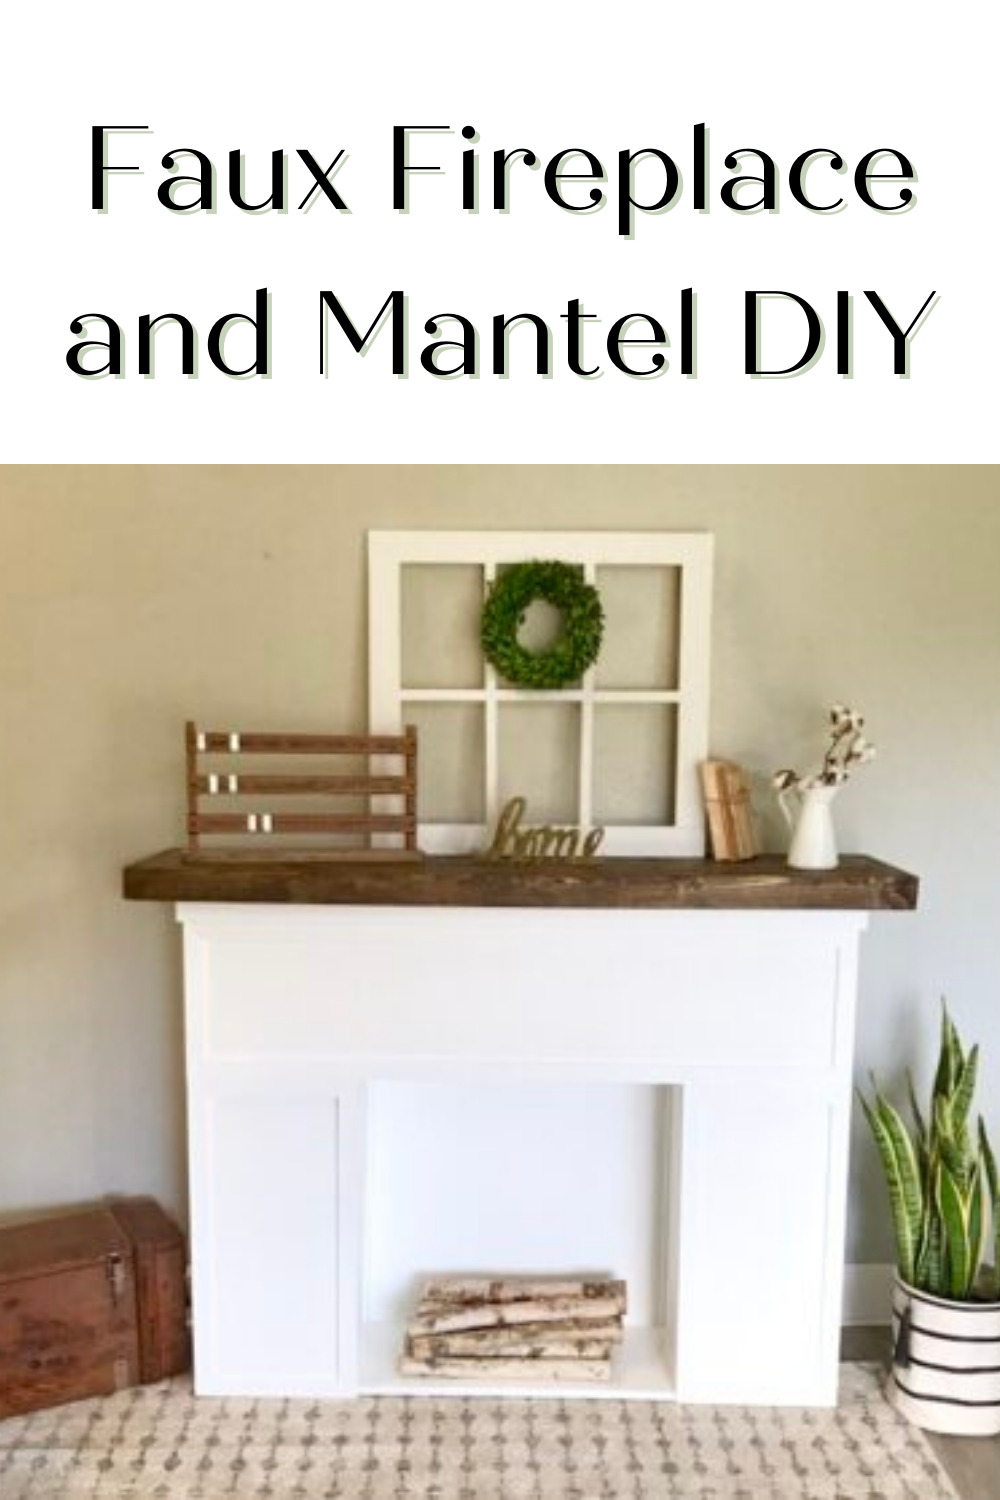
I’m excited to share a project I did for a customer a while back. She came to me with a few different inspiration ideas for a faux fireplace, and I was so excited to build one. I built this while living in Hawaii. There, you don’t see many fireplaces, so this Faux Fireplace and Mantel DIY was a really fun project to help a “mainlander” feel more at home.
If you’re looking for a place to hang your stockings for Santa, and don’t have a fireplace check out the DIY stocking hanger. Anyone looking for a Christmas project, check out our Christmas Fence or these Jingle bells!
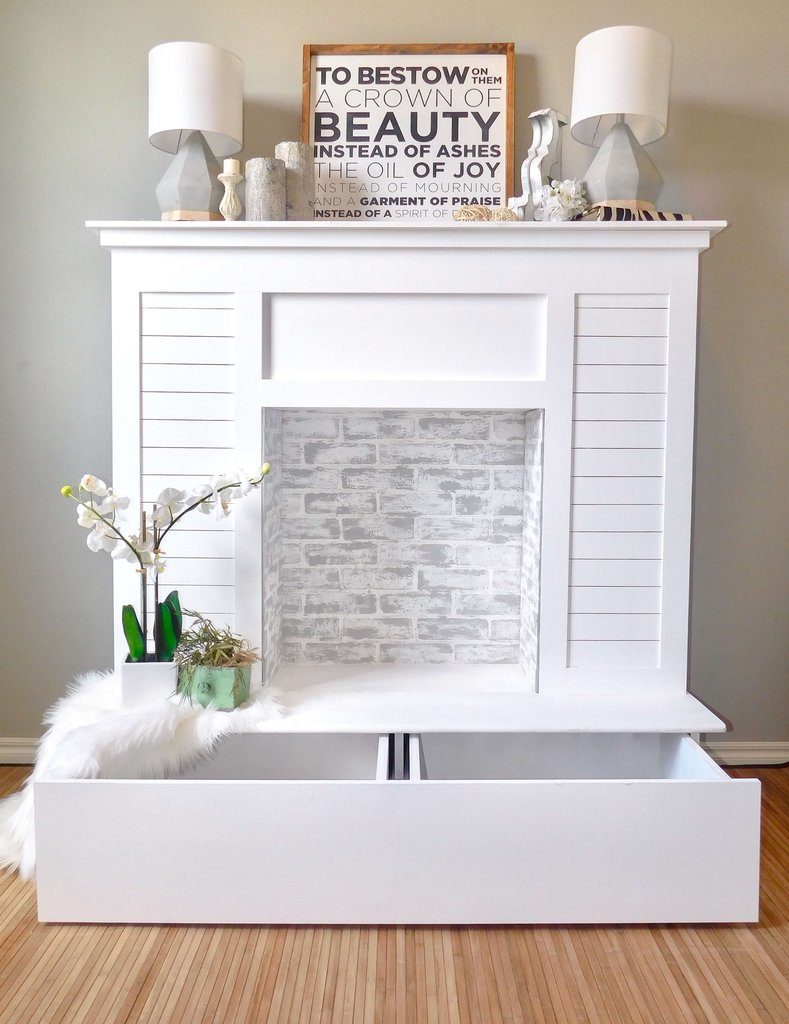
One of the pictures my customer shared with me and loved is this one by Ashley of Smashing DIY:
We both really loved the clean look of Ashley’s faux fireplace, and I knew I wanted to use her tutorial for the scale and bones of the project. My customer really wanted a thicker, wood-stained mantel, and we opted to leave out the hearth, so the fireplace just sits right on the floor.
**This post contains affiliate links.
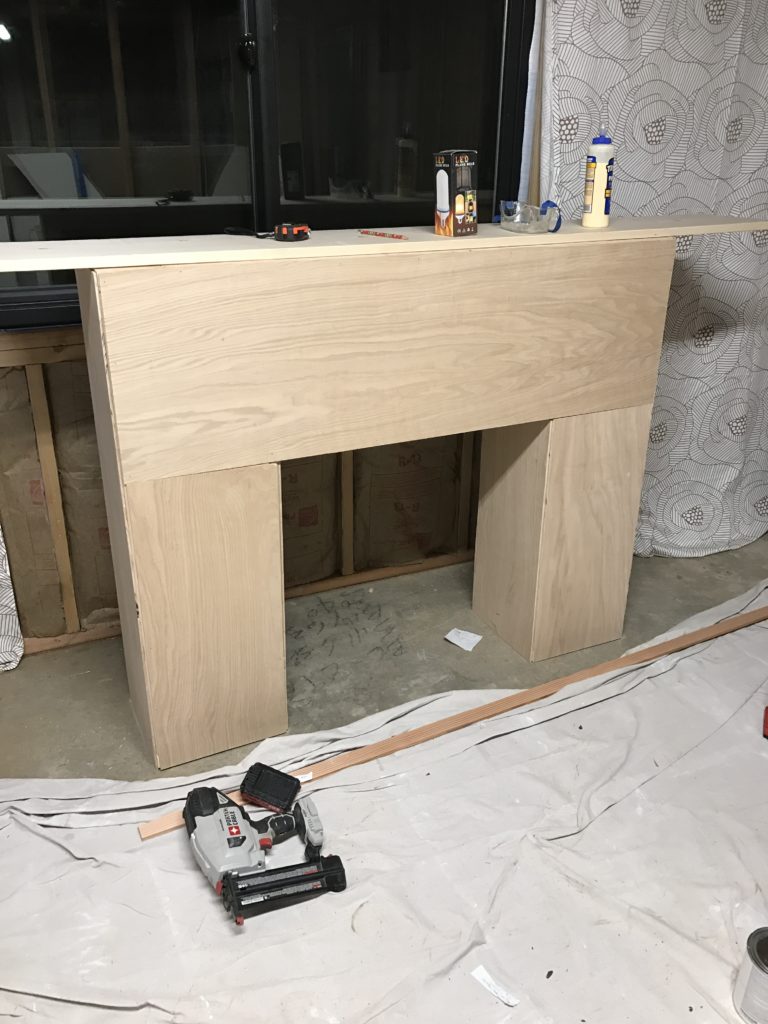
Building the Faux Fireplace Carcass
I built the carcass as per Ashley’s plans, and it was so fun to see it already come to life!
Changes to the Mantel and Fireplace Surround
I also chose to use 1/2″ plywood to cover instead of MDF. Due to the humidity here in Hawaii, MDF doesn’t seem to last long, unfortunately. The plywood turned out so great, and it was easy to install with my brad nailer.
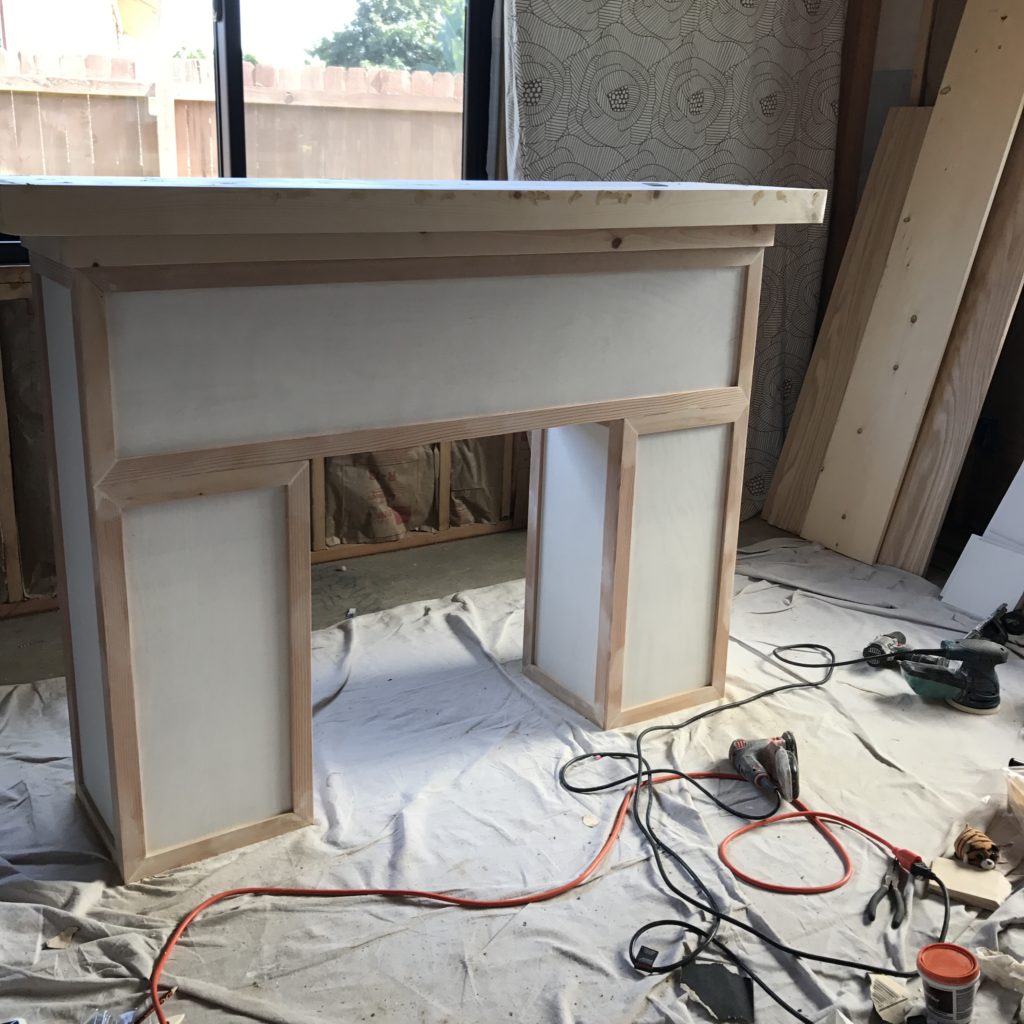
Trimming the Faux Fireplace
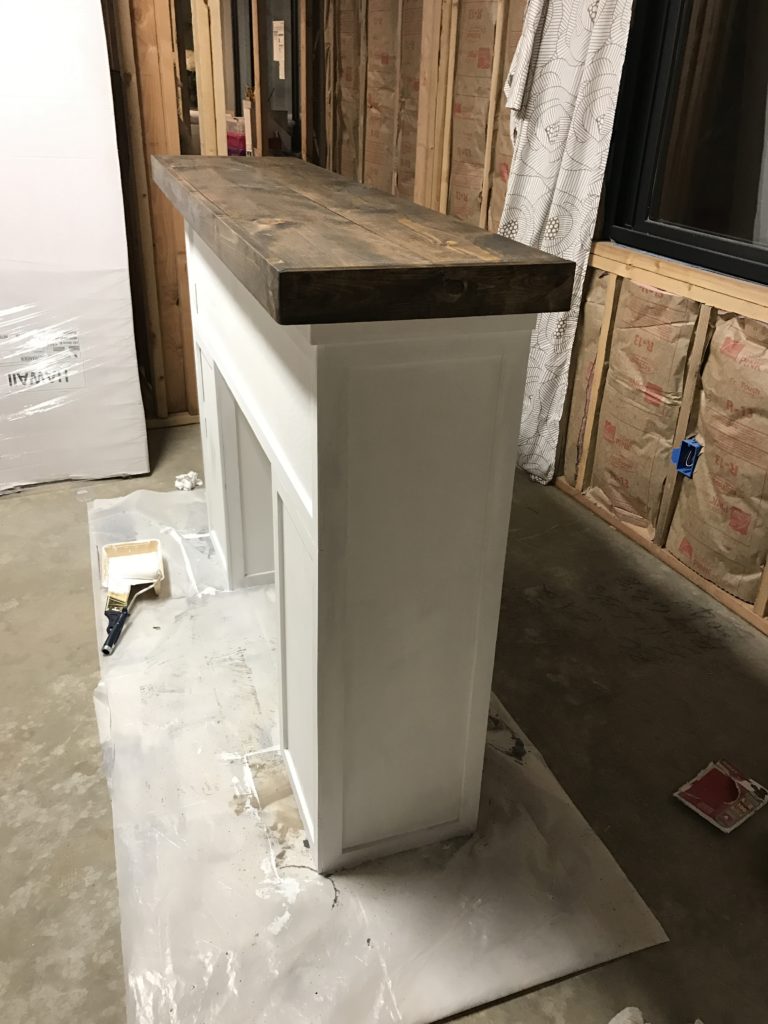
I trimmed this one using 1 11/16″ pine lattice molding, and for the mantel, I used two 1×8 pine boards and framed it in with 1×3 pine. All are attached with wood glue and brad nails and filled in with DAP wood putty The top is stained in this color.
For the finishing touch, I drilled a circular hole in the back with a hole saw for a cord to go through. Now they can use a flickering bulb to really make it look like there’s a fire glowing!
Finished dimensions of my faux fireplace:
You can see that I omitted the base with the drawer and changed the mantel slightly from Ashley’s plans. The finished dimensions of my fireplace are as follows:
The entire fireplace with the mantel is 43.75″ tall x 55″ wide x 15.75″ deep. White base portion is only 14″ deep x 53″ wide, but I chose to have my mantel overhang slightly.
And this basic white lamp cord with a switch for only $8. And I even bought some birch logs from Amazon! I’ve used the same ones in my own fireplace with the same cord and bulb for the last few years. Even though our fireplace is fully functional, we don’t have much use for a fire here. Ha!
Using the 3M High Strength Large Hole Repair Kit and Small Hole Repair All-in-One Applicator
DISCLAIMER: This post is sponsored by 3M.
I’m working on my final bathroom renovation in our Hawaii home, and–as with most renovation projects–I have plenty of holes to repair in the walls.
I had 4 small sets of holes after removing the old towel bar and toilet paper holder. The 3M High Strength Small Hole All-in-One Applicator is perfect for filling in small holes like this! No need to find a putty knife, sander, or spackle…this small product has it all!
Step 1 – Scrape off any excess pieces, so you have a fairly flat surface to work with. You can use the “trowel” or “putty knife” end of the All-in-One Applicator to do this!
Step 2 – Wipe off any dust, and then squirt a dab of spackle onto the holes. Use the flat side again to smooth out and feather the edges.
Step 3 – Allow it to dry fully, and then use the sander on the cap to sand the area.
For the larger hole created by the doorknob, I used the 3M High Strength Large Hole Repair Kit.
The Large Hole Repair Kit comes with a backer plate to provide support to the spackle. To make it a little easier to insert the plate, I cut a square slightly larger than the original hole.
Step 1 – Clean up the edges of the hole. The backer plate is attached with an adhesive, so you will want a dust-free surface to adhere it to.
Step 2 – Peel the paper off the adhesive strips, and put the backer plate behind the drywall.
Step 3 – Use the center pull tabs to pull the backer plate against the drywall. This will help the adhesive stick to the drywall. Once it is secure, you can push the pull tabs back into the center hole.
Step 4 – Cut the adhesive mesh piece to fit over the small opening in the backer plate. Then remove the back to expose the adhesive side and place it over the hole.
Step 5 – Use the included plastic putty knife to apply the spackling. Fill the whole area flush with the existing wall.
Step 6 – Dip the putty knife in water and use it to smooth the surface and feather the edges.
Step 7 – Let the area dry overnight, and then sand with the included sanding sponge. If you have any areas that need to be touched up, a second light coat can be applied and then sanded flush once dry.
**This post contains affiliate links. For more information, please visit my Disclosure page.**
I seriously can’t even believe I got that nasty red stain out! We have a no-food rule in our living room, but the only exception we make is for popcorn on family movie nights. Well, my daughter decided she wanted to add some red li hing flavor powder to her popcorn, and you guessed it…it spilled on the floor. Since it’s powder, we probably could have vacuumed it right up, but the kids decided to scrub it while Mom wasn’t looking instead. Gah!! You can see how that worked out for them…
This is a 9×12 rug, and there was no way that big red stain (and the tons of little red marks all over the place) were going to be hidden. I had remembered seeing a tutorial a long time ago for using Windex and a white towel and iron (Here’s a link to my Rowenta that I love!) to remove carpet stains, so I decided to give it a shot!
I made a video if you want to see how it worked.
I’m shocked at how well it worked! It ruined a couple of my white towels, but I’m so thankful my rug has been saved!
Let me know if it works for you and other stains! I feel like the dad on My Big Fat Greek Wedding! I want to carry Windex around and spray it on everything! 😉
First, I have to thank Ashley from Handmade Haven for contacting me and offering to make plans for my media console. She’s so talented, and I’m honored that she liked my project enough to feel comfortable having it on her site along with all her beautiful builds. She’s amazing!
Now on to the build!
I originally designed this piece for my own home. I had seen lots of beautiful consoles out there, but none of them had shelves at the top for our electronic devices. Yes, I could put them in the center, but I didn’t love that look quite as much. So I sketched one out for myself. Then I had a customer request a sliding door console, and when I showed her my sketch, she loved it!
I looked at plans from Shanty 2 Chic as well as Ana White and Jaime Costiglio to get me started and give me a jumping off point. I recommend checking them all out for more tips and tricks!
First, I assembled the carcass. I used 3/4″ poplar plywood from Home Depot and had them rip the 4×8 piece into three 15″ strips. The 4 x 4 sheet, I had them rip one 15″ strip vertically and then the left-over piece ripped into three 15″ strips again. I then cut everything to length at home on my miter saw.
Since I had planned to build a second one for myself, I wasn’t great at taking progress pics at this point. I wanted to see how it all came together first. When I build the second one, I’ll update with more pics. 😉
This is the point when I finally thought, “I think this might actually work!” Ha!
Ashley has all the plans laid out, but a few things I wanted to point out. Make sure you wait to cut your face trim (the 1×2’s and 1×6) until you’ve got the 1×4 base trim on. Then do the two end vertical 1×2 pieces and measure from your piece to make sure you’re not off by a touch. Then the horizontal 1×6. Then the other 4 vertical 1×2’s (two long and two small for top shelf). And last the three horizontal 1×2’s across the middle shelf. You want a nice, tight fit, so even 1/4″ can leave a big gap!
I will do a separate post on the herringbone pattern with a video soon. But I used 1×6’s and all 45 degree miters. I just attached them with brad nails directly to the plywood base.
I also mitered my 1×3’s at the corners to frame it out since I think it gives it a nice, clean look.
I stained it at this point before adding the track and hardware. I used Danish Oil in Medium Walnut per my customer’s request. I think it contrasts nicely with the black hardware.
I find that the Danish Oil tends to dry out the wood fairly quickly, so I sealed it with Minwax Polycrylic just a couple hours later.
Then I moved on to the hardware. I used the Shanty 2 Chic plans for DIY sliding barn door hardware, and their tutorial and video were REALLY helpful.
I did end up making some changes and adjustments, though. Since I was doing two doors, I needed to buy double of the door hardware. I doubled everything but the track/bar. Since this is also longer, I wanted two additional screws and spacers to secure it better. I bought an 8′ aluminum bar, and I really didn’t want to have to buy another one for the vertical pieces on the doors, so I also shortened the length of those from the original plans. I cut my bar right around 71″, and the vertical pieces at 6″.
At that point, I noticed a couple things that I knew were going to bother me. One, there’s nothing to keep the doors from sliding right off the end of the track. Most barn doors have stoppers at the end to keep them on the rail. And the second thing is that since the spacer is a full 1″, it leaves a big gap at the top, and then the bottom of the door swings closed. So from the side, the gap is uneven. It’s not a big deal, but aesthetically it bothered me a little.
To fix the problem, I got rid of the 1″ spacers. I went back to Home Depot and bought six 1/2″ spacers instead. I used 4 of them between the track and the console, and then I used two to go on the outside of the track at the two end screws. That provided a little stopper for my doors!
Be sure to either use shorter screws for the two middle spacers, or place them right where the vertical plywood is, or your screws will be too long and stick out behind your 1×6. It’s not a big deal and won’t be noticed, but just something to be aware of.
Here you can see how the door is nice and flush with the console. Perfect gap!
And the final step was to attach the backing and drill holes for the cords! I used a 1.25″ hole saw drill attachment to make a good size hole in each of the top three shelves.
I think it still looks nice and neat but allows the electronics to be easily accessible.
I’ll also try to do a video or tutorial for the door pattern if you’re interested? Also just more 45 degree angles.
And one final tip, I used Rustoleum spray paint for all the hardware, and it worked beautifully! But I noticed that the top of the track was starting to peel and flake off. It stayed just fine on the plastic wheels (which actually surprised me!) but didn’t like the aluminum bar for some reason. I tried multiple different paints and sanding, but nothing worked. I finally decided to just sand off the top of the rail and leave the silver exposed, so it wasn’t just chippy paint everywhere.
It worked great! It looks like it was meant to be that way, and no more chipping!
Thank you again, Ashley, for helping me get plans out to the world. You are a rock star!
I’m getting ready for a Halloween party here in Italy this week, and with the combination of languages, I was afraid the other version of BINGO might just be a little too much for this group. We also have quite a few really young kids, so I wanted something that wouldn’t take as much time (short attention spans and all, you know?).
So here’s a 4×4 BINGO. Each item/drawing is only repeated once, so there’s no hassle with putting the items back in, etc.
And HERE IS THE LINK for the printable. Some people said the font I used for BINGO wasn’t showing up correctly, so you may have to download the actual font. It’s called Halloween Spider and is free on DaFont.com.
I’m writing this post ahead of time, but by the time it goes live, I WILL BE IN ITALY!!! YAY!!!!!!!
Even though I’m now living in Italy, I’m still trying to live an “aloha life”, and a chunk of my heart is still in Hawaii. So today’s post is perfect.
I’m representing Hawaii in Beckie’s blogging tour of the U.S.–“Show Your State Pride”. Visit her amazing blog Infarrantly Creative to see what the other states have in store for you as well!
This is a blog hop, so if you’re following along, you should have just visited from Gina at The Shabby Creek Cottage
This is a fun little project that is perfect to give away for almost any occasion. A birthday boy or girl would be thrilled to have this as their gift or added to their gift!
That’s it! Super basic supplies that most moms have on-hand, right?!
This week we spent a lot of time waiting for dad to out-process (military translation: spend a full week driving around your post getting random signatures and waiting in lots and lots of lines and meetings). During one of those meetings, I had to get creative with 4 bored children, so I started busting out my origami skills with some dollars.
If you’ve spent much time on Oahu, you may know that the Japanese culture also has a large presence on the island. My kids’ school actually teaches both Hawaiian and Japanese, and they spend some time doing origami. I’ve always enjoyed tinkering with paper, and with three girls, it provides hours of entertainment!
This day’s creations were a fish, a jumping frog, and a heart flower. You can find decent tutorials for those on YouTube, so I’d recommend searching there if you’d like to add them to your lei as well.
Now let’s get working on our leis!
STEP 1:
Spread out your cling wrap on a flat surface. The length will depend on the size of the recipient. If you scroll to the end, you can see mine is on a 7-year-old, and the length of my wrap was about 30″.
STEP 2:
Position your treats on the wrap. I put them in about 2″ from the front edge, so it’s easier to make the first wrap. I use 6 or 7 treats depending on their size.
And I leave maybe 2″ or 3″ between each item, depending on their size.
STEP 3:
Fold the bottom edge up and over your treats.
STEP 4:
Continue rolling the rest of the wrap with the items in it until it is all rolled up. I did this project with a class of 2nd graders and a class of 1st graders, and they got really nervous about this part. DON’T STRESS YOURSELF OUT! It’s all going to look about the same anyway. Just roll it up! 🙂 It doesn’t have to be perfection.
You can see my fishy was kind of hard to make out once he was all wrapped up, but I wasn’t too worried. I know they’ll see $$ and will be thrilled! Then once they get it open, they’ll be excited to see it’s in a shape. 😉
STEP 5:
Cut your curling ribbon into pieces about 6″ long (longer if you want bigger curls), and tie them at the ends and between each of the treats.
BONUS: As always, I was looking for extra things to keep my girls content and occupied while I was working on this, and they love to “help”, so I put them to work cutting out tons of these little flowers. I drew a template for them, and they got to work. Then I just slid them on near the pieces of ribbon for a little added color. The center holes of some were a bit too large, so they fell off. If you’re going to do this step, I’d recommend adding a piece of tape to close that slit end back together after attaching them to the lei.
I loved all the colors, though! And keeping my kids entertained, involved, and in the same room as me is always an added bonus.
STEP 6:
Curl your ribbons and then take the two ends and tie them in a knot together. You can trim the excess plastic if it bugs you too much. It didn’t bother me until I was editing my photos and noticed it. Ha!
And there’s your super easy, inexpensive gift that will brighten anyone’s day!
Next on the tour is Kim at Today’s Creative Blog. Go check out what Washington has in store for you!
Yet another DIY gift for someone we love, I present this DIY Birthday Chart Sign! Great for grandparents, mothers, fathers and even the kids in the family.
I also have another awesome calendar you can make if you’re looking for more ideas.
I actually made one of these birthday calendar boards for my mother-in-law a few years ago, but I had taken a pause from blogging during that time, so I don’t have a great pic of it.
Anyway, my mom has had quite a few grandbabies born in the last few years, so I decided to make one for her, too!
For the actual sign, I used some scrap plywood I had. I kind of wish I had used better plywood since this left the surface rather bumpy, but oh well. My board was cut to 6″x24″, but you can make it any dimensions you’d like. For the trim, I used 1×2’s. The two side pieces are cut to 6″, and the top and bottom are 25.5″.
You can see all the patching I had to do for the knots and bumps since the plywood I used was treated and for outdoor use.
I painted the plywood white and stained the trim with dark walnut. Then I attached with wood glue and 1.25″ brad nails.
For the name tags, I used paint sticks that I got for free from our local home improvement store. To make it easier to cut them all at once, I used a rubber band on each end to attach them all together. Then I cut them (turned on their sides) on my miter saw.
I cut off the handle, and then I cut it into thirds. I also sanded them while they were still bound with the rubber bands! Big time saver.
Then I painted them all white and wrote the names and day of their birthdate of all the children, spouses, and grandkids. On the back I wrote out the full birthday just so she can keep track of how old everyone is and just in case they get on the wrong month accidentally!
I drilled two holes near the top to thread my string through. I didn’t want the holes to be too big, but this made it hard to thread the baker’s twine through. I ended up using a needle with a large eye to thread them.
In order to save myself from having to thread the needed 30 times, I cut a really long piece of the string, (maybe 3′?), and then I’d pull the stick almost all the way to the end. That way I could keep the needle threaded for the next one.
Tie a knot in the end without the needle, and then pull it tight and through the back. From the stick to the last knot, I left my string at 3″. I made a mark with a marker at 3″ and then cut it at about 4″, so I had enough room to tie the other knot. Make sure your knot lands right at the mark you made, so they all hang at about the same height.
I used vinyl to make a stencil to paint the letters. Again, because the wood was so lumpy, it created a bit of a mess. Definitely not my finest work here. I think I would have been better off painting it by hand. I had to go back and do lots of clean ups, and even then, it was far from perfect.
To hang the sticks, I screwed in some small hooks. They’re tiny enough that I didn’t even need to pre-drill holes. I just centered them on the months and twisted them in.
And that’s it! A custom-made Mother’s Day gift using supplies I already had at home!
A couple weeks ago I shared a post about making a chalkboard countdown calendar to celebrate any occasion. Well, as I was preparing to build it, I was searching on Amazon for similar wood calendars, and I came across this one:
It wasn’t a countdown calendar, but I really fell in love with it. But at $58, I wasn’t ready to make a commitment. I knew I could make it for a fraction of that, so I set to work.
Wood list:
1×4 – 1 piece cut to 19″
1×2 – 3 pieces cut to 18″ for rails
2 pieces cut to 10″ for side pieces
I wanted my 1×2 rails to fit almost flush inside the side posts, so I laid all three rails on top of the posts and marked the width and where I wanted them to sit. Then I used my miter saw and set the depth to just over 1/2″. I did both posts at the same time to save some time, but it was still a little tedious.
Then I stained my pieces since I wanted to make sure to get down in that notched area. Since I was using scrap wood, I knew my pieces might not match perfectly, and I was okay with that. I also distressed my pieces a bit before to give it more of an aged look and somewhere for the stain to really sink in.
I pre-drilled my holes and used 1″ black screws to attach my rails in place. Be careful not to tighten them too much since it’s right at the end of the wood. You don’t want your wood to split!
And I just put one screw in the bottom on each side to keep the posts up. Your posts should be inset about 1/2″ on each side.
And I’m pretty horrible at writing and painting, so I had to use my Silhouette to cut out a template for the lettering.
Be sure to inset the lettering at least 1/2″ from the sides to allow for the glide to fit and not cover your words. And I used this paint pen to make the lettering a little easier.
And it was at this point that I was a little stumped. I wasn’t exactly sure how to make the tabs like they use on card catalogs. I started researching a bit, and what did I find?? Yup…someone had already built one of these babies and done a tutorial for it. DUH!
And it was so beautiful! Amber from Shades of Blue Interiors had written a post for EHow all about how she built one for about $20. She used some brass card label holders from Rockler, and I loved the look of them! I highly recommend visiting her tutorial to see how she made hers.
But alas, I’m impatient and didn’t want to wait for anything to ship to my little island in the middle of the ocean. I also didn’t really want to spend more money and wanted to try to use things around the house.
So here’s what I came up with. I had some left-over flashing from a repair to our chimney. But I priced it out at our local Ace Hardware, and you can purchase it for $.75 for a foot. That’s all you’ll need for all three.
Since your lettering will be a bit different than mine, I’ll just give a general description of the measurements. Each piece will need to be 5″ in length, though, if you’re using 1×2 wood.
To determine the width, measure 1/2″ for each side, and then measure your longest word per line. My first row was just over 1″, so I cut my piece to 2″ wide and 5″ long.
Then I drew lines using a square. One line will need to go straight across at 3″ (if you’ve cut your piece at 5″, that will give you a 2″ side and a 3″ side). On the 2″ side, draw 2 vertical lines each 1/2″ in from the sides.
Then cut out the center rectangle with tin snips. Be sure to wear gloves since the pieces can be really sharp. Once mine was cut out, I used sandpaper to sand all the edges as well.
Now line it up so the top of your cut out rectangle is at the front and top edge of your wood. Then bend your “legs” over the front and wrap them around the bottom.
You’ll do the same over the back, so the finished bracket will look like this:
You don’t want it to be too tight, or it will make it difficult to slide and will peel your wood as you slide it from side to side.
Once you have it how you want it, put a couple dots of hot glue on the “legs” and glue them to the inside of the back piece, so the back looks solid like this:
And there you have it. A simple and super cheap DIY’ed perpetual calendar. This project was free for me with scrap supplies. All in all, the supplies could be purchased for less than $5, though.
Not bad for a simple build!
This might even make a fun Mother’s Day gift if you have a mom who loves unique items and home decor. 🙂
I actually built my lollipop stand almost 3 years ago and have used it more times than I can count. It’s always a huge hit and gives some great height, dimension, and colors to the party table.
I loved the idea of a lollipop stand, but I knew I wanted it to be a bit taller to give more height on my table. And since I was living in Italy at the time, it was more difficult (and EXPENSIVE) to buy round wooden dowels. I had some 2×2’s on hand that I had moved from the States with me, so I decided to use that instead. It also made it a little easier to drill the holes since the 2×2 won’t roll away. 😉
This post contains affiliate links to items used in this tutorial. All opinions are my own.
Supplies needed:
– 2×2 – cut to 24″
– 1×6 scrap – cut to 6.5″
– Wood finial
– Paint
– 1.25″ screws (2)
– Decorative contact paper (optional)
Step 1 – Cut pieces:
Cut your 2×2 to 24″ in length. I primed mine then and to avoid paint dripping in all the holes.
Step 2 – Drill holes for suckers:
Then drill holes at an angle. Jaime’s tutorial has some great tips on drilling the holes. I didn’t bother measuring and marking mine. I just kind of eyeballed it since I’m lazy like that. I ended up with 22-24 holes per side, so it would be slightly less than 100 suckers/lollipops in all.
Step 3 – Attach the base:
Jaime attached hers with wood glue, but I thought I might want to change the stand out later. I also wanted to be able to break it down smaller to fit in my storage box more easily. I decided to skip the glue and did two screws to keep it from twisting. I’ve taken it down and up numerous times in the last few years, and it still works like a charm. I’ve also changed out the contact paper a couple times to match different events. Red for our Christmas party, pink for an American Girls’ Doll party, etc. I just wrap it similar to a present and cut off the excess, so it stays flat.
Step 4 – Attach the finial:
The finial was something I happened to have on hand and liked that it gave a finished look to the top. You can find them at home improvement stores, craft stores, and even on Amazon. They range in price from $3 – close to $25 for some nicer ones!
And you’re done! It’s as easy as that! Cut, paint, drill, attach.
Here’s mine at a few of our favorite parties. This pic isn’t great quality, but I wanted to show you the height comparison with my daughter. This was also with the pink contact paper.
And this was a luau-themed birthday party. We used these surfboard suckers and these twist lollipops. They’re super cute, but honestly they don’t taste that great. The kids didn’t seem to mind, though. Ha!
And that’s it. Quite possibly the easiest beginner build you can think of! The drilling is a little tedious, but it’s nothing tricky or difficult.
So, what do you call them in your part of the world? Suckers? Lollipops? Lollies? Leave me a note with where you live and what you call them.
Today I’m so excited to share my mantel and DIY built in bookshelf makeover. This has been such a long process, and we’ve still got some work to do, but I wanted to give an update of the project.
I know this next pic is amazing. You’ll love everything about it. The grainy, unfocused photography. The awesome printed brown carpet. The ugly tile and weird little cove with no actual mantel. And can we just add a note that there’s even a fireplace in Hawaii?? What were they thinking? Oh, well. This is from the listing when we purchased the home, and I’ve hated it since day 1.
We removed the carpet and put down laminate flooring right after moving in almost 7 years ago. With the island humidity and a few years of wear and tear by us and by renters with pets (while we lived in Italy), the flooring was in pretty bad shape. So we tore out the laminate floors before moving back in last summer and decided tile would be a better option.
But before the new tile could be laid, I was super excited to remove the tile around the fireplace!
We made sure to check local codes, and our black surround was large enough and deep enough that we could put the new wood surround right up to it. I don’t think we’ll ever use the fireplace because…Hawaii…but I still like to make sure we’re doing things the right way.
Once that stuff was all settled, I got to the fun part of designing the space.
We have vaulted ceilings in this room, and it’s a little awkward with the window on one side. I wasn’t sure I’d like having the built-ins on only one side, but I really wanted to utilize that space. Once it was sketched, it really started to grow on me.
So then it was time to design the mantel.
My husband had a couple days off, so we took a break from the mantel work to do the flooring. I knew I could do the all the woodwork myself, but I’d never laid floor tile. It’s nice to have someone to bounce ideas off of and help you get a project started. We chose 6×36″ wood-look tile from Home Depot called Dovewood. I’m not gonna lie, they are not easy to install. It took us quite a bit of trial and error to get in a good groove. We bought 4 pallets since we’ll eventually be tiling over 1000 sq ft with it.
We finished about 1/2 of the room together, and then I did the rest of the room myself.
Since every house is slightly different, there wasn’t a perfect tutorial out there that told me exactly how and what to build. But there were a couple that really gave me some good inspiration and tips. One is Sarah from Thrifty Decor Chick. She’s always amazing. And we share the same birthday, so she’s my bloggy idol. 😉
I primed all my plywood before putting it up. I really hate painting… Ha!
The small alcove on the left is only 6″ deep, and I wanted it to be flush with the fireplace, so I just used 1x6s. I wanted the shelves to be strong, but I didn’t want the holes from a jig to show since some of the shelves are above head height and will be visible from below. I decided to notch out slots to slide the shelves into as the edges would all be covered by the trim.
And here it is all trimmed out. We ran cables through the hollow posts down to all the electronics on the bottom shelves that would be hidden by the cabinet doors.
I decided to take a break since it was the second week in December, and I was really itching to get my Christmas decorations up. No cabinet doors to cover our ugly electronics, but I was really excited to have the room mostly together!
After Christmas, I had had enough of the ugly cords and cables, so I busted out the miter saw and built the cabinet doors.
I made the mistake of using cheap hardware the first time, and it was garbage. I decided to switch to some H-brackets, but I had to mortise the hinges to recess them into the doors.
Since the H-brackets are set on the outside of the door, I didn’t need to worry about my previous holes causing problems.
I like the look of these much more.
And I used Sarah’s brilliant idea of using the radiator cover in the panel, so our remotes work to our electronics in the cabinet.
I’m still planning to do some shiplap up the back of the fireplace, and I’m building drawers for the small shelf above the cabinet doors. We’ll hide the remotes in there.
This post contains Amazon Affiliate links. It does not cost you the customer. It is simply a way to help compensate for my time in creating these blog posts. All opinions are my own.
What do you do when it’s Friday night, and your 4-year-old has a birthday party to attend the next day, and you REALLY don’t want to make a trip to Wal-mart with all your kids–and your husband is busy (longest sentence ever)? 🙂
You sort through your scraps and build something, of course!
I had both a 1×6 scrap and a 1×8 scrap, so I thought they would make the perfect headboard and footboard for an upholstered American Girls doll bed.
CUT LIST:
1×6 – 1@ 8″ long for footboard
1×8 – 1@ 8″ long for headboard
1×2 – 2@ 9″ long for headboard posts
– 2@ 7.25″ long for footboard posts
– 5@ 9.5″ long for slats
1×3 – 2@ 19″ long for side rails
Step 1) Attach headboard posts to headboard by either using pocket screws and a jig or using 2.5″ screws and glue (I use this brand).
Step 2) Do the same for the footboard pieces
Step 3) Build your base using 1.5″ brad nails and wood glue. I chose to do 1×3’s on the siderails, so the mattress sits down inside the rails a bit.
Step 4) Upholster the headboard and footboard, but as you can see from this pic below, I was careful not to staple along the bottom quite yet since you will need to lift it up to attach them to the base. And upholster your side rails.
Step 5) Use 1.5″ wood screws and attach the headboard and footboard to your base. I think I did 5 screws on each end.
I wrote a tutorial HERE on how to make the boxed mattresses for the AG doll beds.
Since it was for my daughter’s friend, I let her dig through all my fabric and choose the upholstery, pillow fabrics, and bedding fabrics. I wasn’t loving all the black and white, but she insisted that’s what she wanted. And she chose just a basic soft felt fabric for the comforter and wouldn’t let me even put any trim on it! I had to practically beg her to let me give it the pink accent pillow. Ha!
You can see that as I was in a hurry to build, I didn’t measure my headboard and footboard pieces correctly, so my side rails are slightly inset. I like the look of the flush side rails, so that is how the plans are.
I’m happy to report that the bed was the hit of the party, and it’s become a favorite toy already. Can’t beat that! And it helped use up some of my scrap stash, and that always makes my husband happy! Double win!
I wish I had a picture with the dolls, so you can see the size, but this it large. It’s built to fit an American Girl 18″ doll! So fun to give handmade gifts!
Here are the final dimensions:
Here are links to my doll bedding tutorials and other doll beds:

 So sad! Complete with red crayon marks and pen. Classy, right?